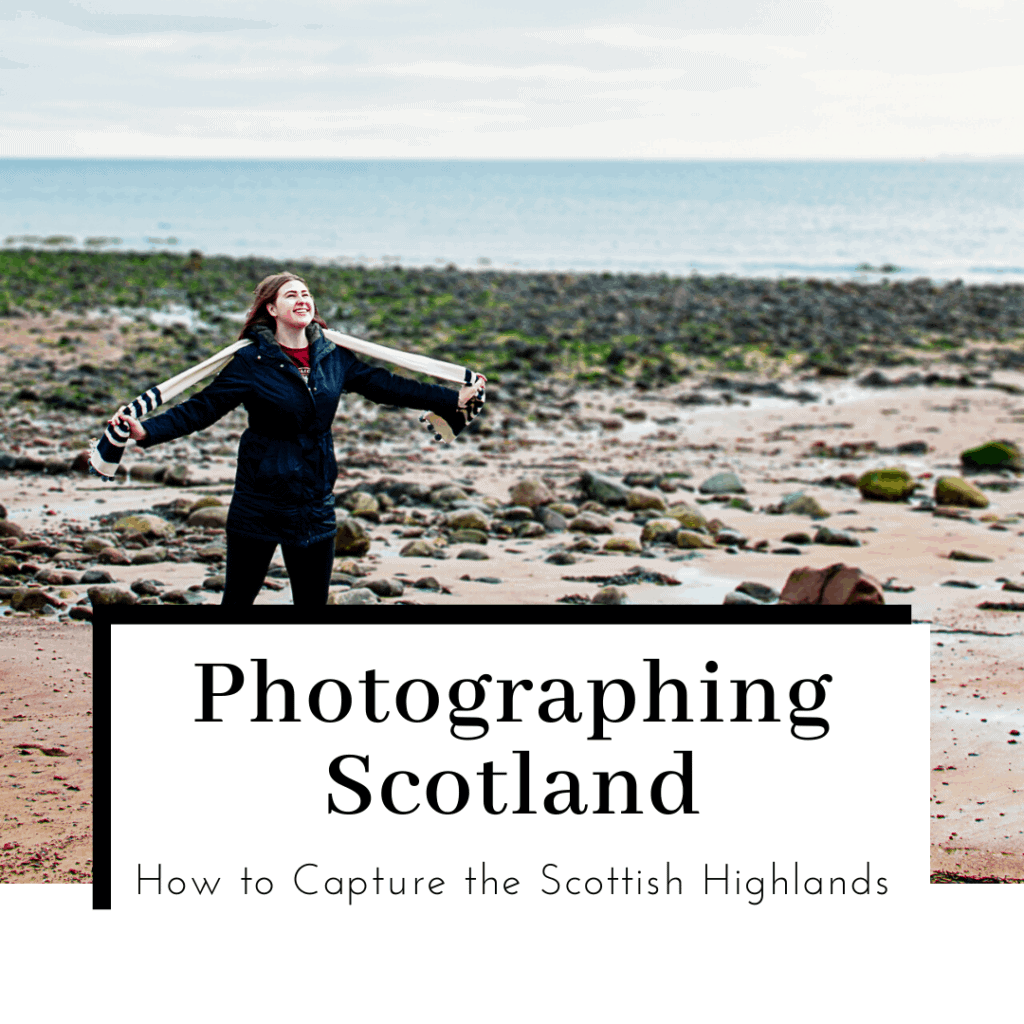
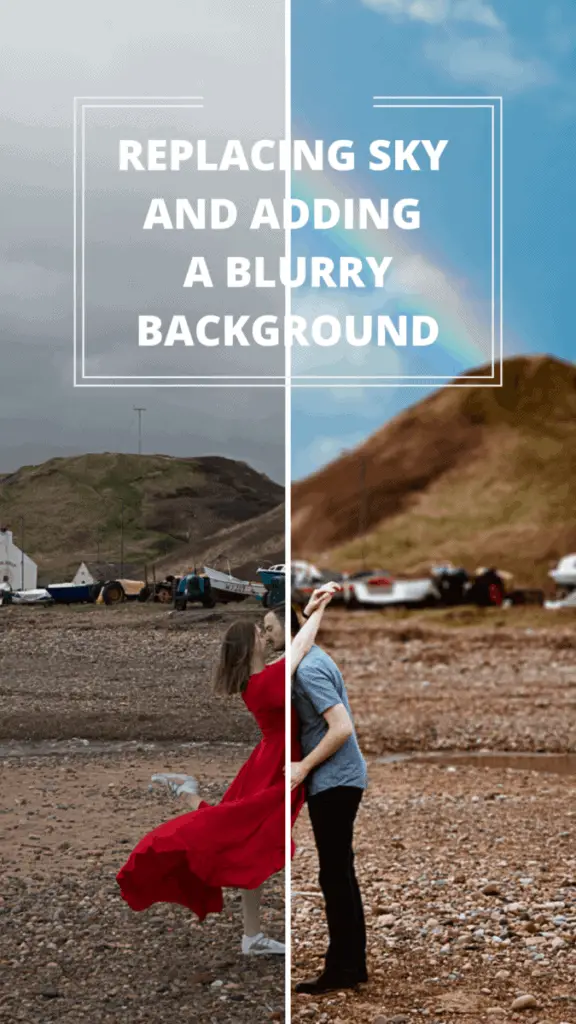
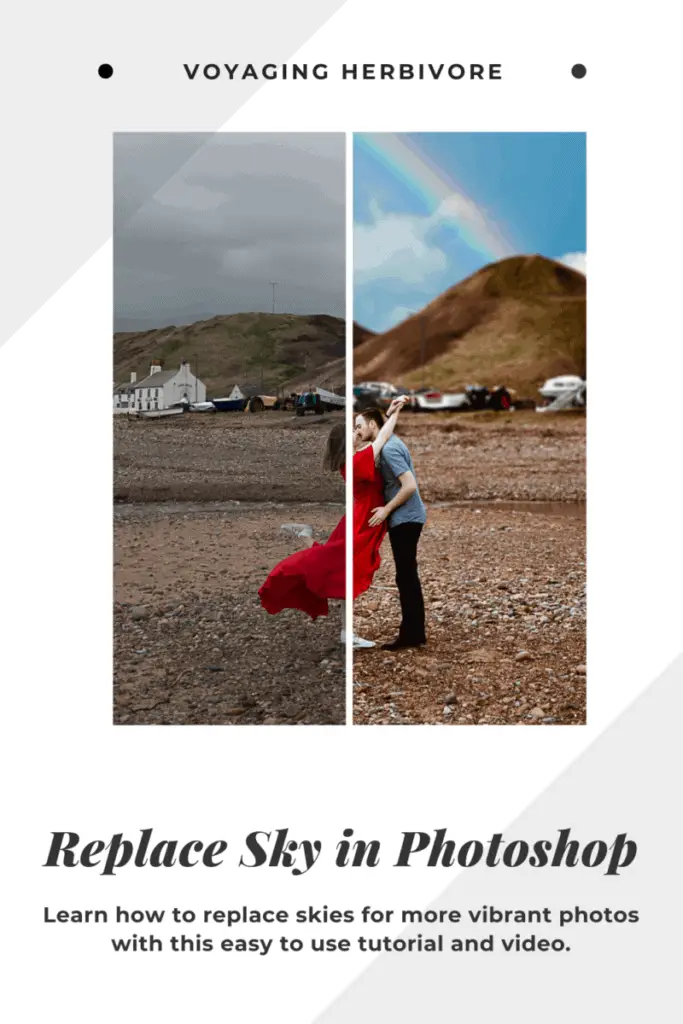
Whether you’re looking to add a bit of flair to your Instagram photos, or you’re a professional photographer hoping to improve your client shots, this article is for you!
By the end of this sky overlay Photoshop tutorial, you’ll know how to replace the sky in any photo (in just a few easy steps!) and add a blurry background (deepen the depth of field).
Keep reading to start mastering Photoshop!
Table of contents
- Getting Started With Adobe Lightroom and Photoshop
- Download Our FREE Lightroom Preset
- Sky Presets for Photoshop
- In Lightroom
- In Photoshop
- Adding Depth of Field (Blurry Background) in Photoshop
- Photoshop Actions for Sky
- Essential Photography Tools
- Keep Learning Photography and Editing
- Pin Sky Overlay Photoshop and Blurring Background Tutorial
Getting Started With Adobe Lightroom and Photoshop
Before we dive into the specific techniques of learning how to do a sky overlay and blur the background of a photograph in Photoshop, you need to make sure that you have Lightroom and Photoshop.
You can download a free Photoshop and Lightroom trial, or invest in the Photography Plan which includes Lightroom and Photoshop for $10 a month. If you’re a student (even of an online course like Lost Creator Academy or Club Life Design), you can get a student discount on all Adobe apps as well.
Even if you think that you could get away with just Photoshop, I highly recommend the Creative Cloud subscription for constant updates. Lightroom is also a great organizational tool. Collections help you keep everything organized and you can make pretty extensive edits.
Read More: Really Worth $800? – Lost Creator Academy Photography and Videography School for Creators
Read More: Club Life Design – Mobile Editing Masterclass Complete REview
Download Our FREE Lightroom Preset
The next thing that you need to do for this sky overlay Photoshop tutorial is to download our free Lightroom preset. This will help you color correct your photo and prep it for the sky overlay and blurry background part of the tutorial.
If you try out the preset please tag us on Instagram @HerbivorePresets and message us there with any questions.
Original 
One-Click With Our Free Preset
Please keep in mind that the preset will look different with every photo. For a wider variety of presets, check out Herbivore Presets!
Free Resources


Sky Presets for Photoshop
Looking for a quick way to boost your sky without having to go through the full effort of a sky overlay and replacement in Photoshop?
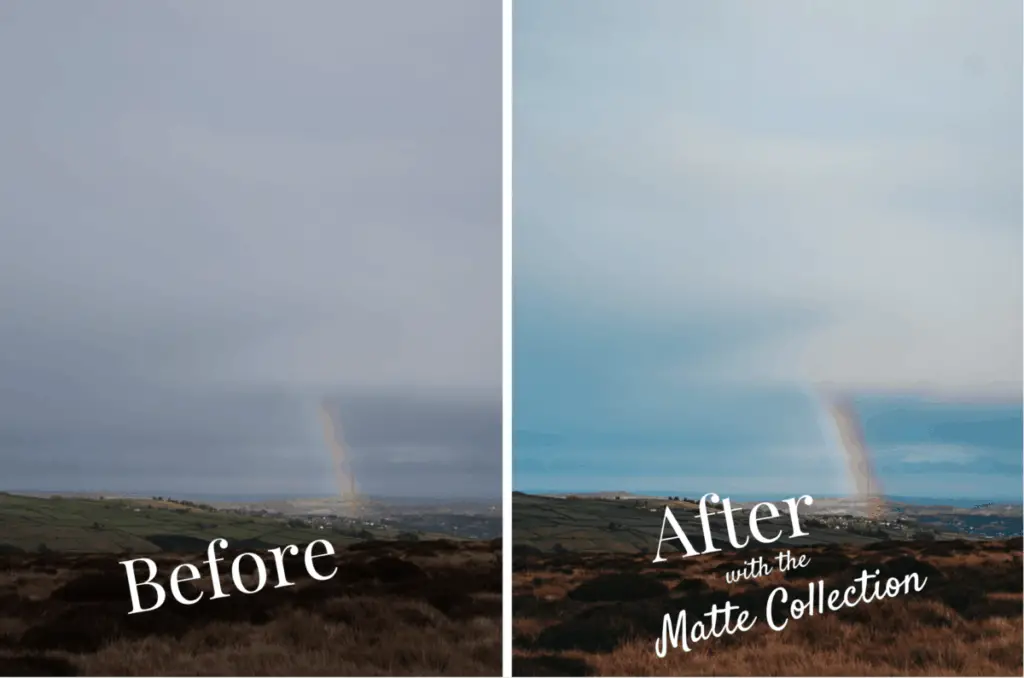
If you have a grey sky that you’re looking to add a gorgeous pop of color to, the Matte Preset Collection (Preset 5 & Preset 8) will give you just the pop you’re looking for!
Check out the photos below to see the before and after with one click in Lightroom – using Matte #5. Available for desktop or mobile and can be used on the FREE Lightroom mobile app!
In Lightroom
Step 1: Crop Your Photo 8×10 Ratio
The first step in editing this photo, which I already know is going to be for Instagram, is to crop it at an 8 x 10 ratio. This ensures that none of it will get cut off by Instagram.
When you crop, make sure to apply the rule of thirds for maximum visual appeal. In this particular photo, I’m trying to have the sky take up most of the photo since I know we will be adding in a beautiful rainbow.
Step 2: Apply Your Lightroom Preset
Next, we’re using the preset that you downloaded and installed earlier. Simply clicking on the preset once installed in Lightroom might do the trick, but you might need to play with exposure and other sliders to get it to look perfect. Remember, we’ll be replacing the sky with a bright blue sky and rainbow, so you want the photo to look bright and cheery too.
Next, right click on your photo and click “Open With Photoshop“
In Photoshop
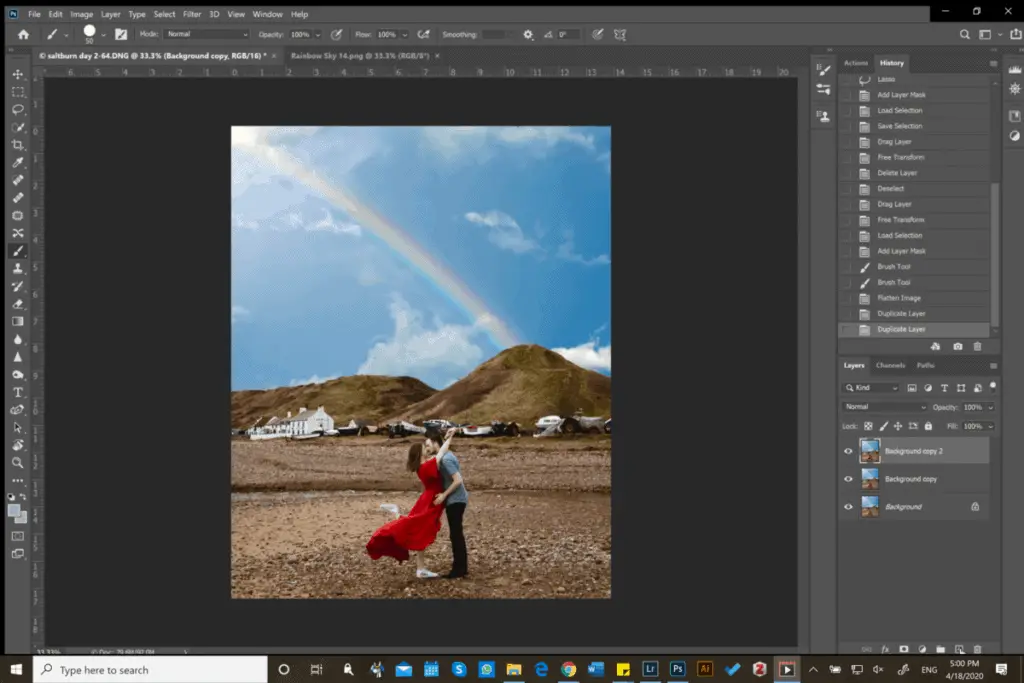
Step 3: Duplicate Your Background
Your photo should now be ready for a sky overlay in Photoshop.
First, make a copy of your original layer. We want to edit non destructively so create a copy by clicking “Ctrl J“. Now, make sure that all of the work you do happens on this copy layer, not your original background layer
Step 4: Select the Sky
There are a few ways that you can select the sky, and what works best will depend on each individual photo.
Method 1: Use the select tool to click and drag to select your sky. You can quickly add or remove sections by holding the “alt” key while selecting.
Method 2: Go “Select” then “Color Range” and use the dropper tools that pop up to select the sky. The selection might not be perfect so use your lasso tool and the alt key to add or deselect the appropriate areas.
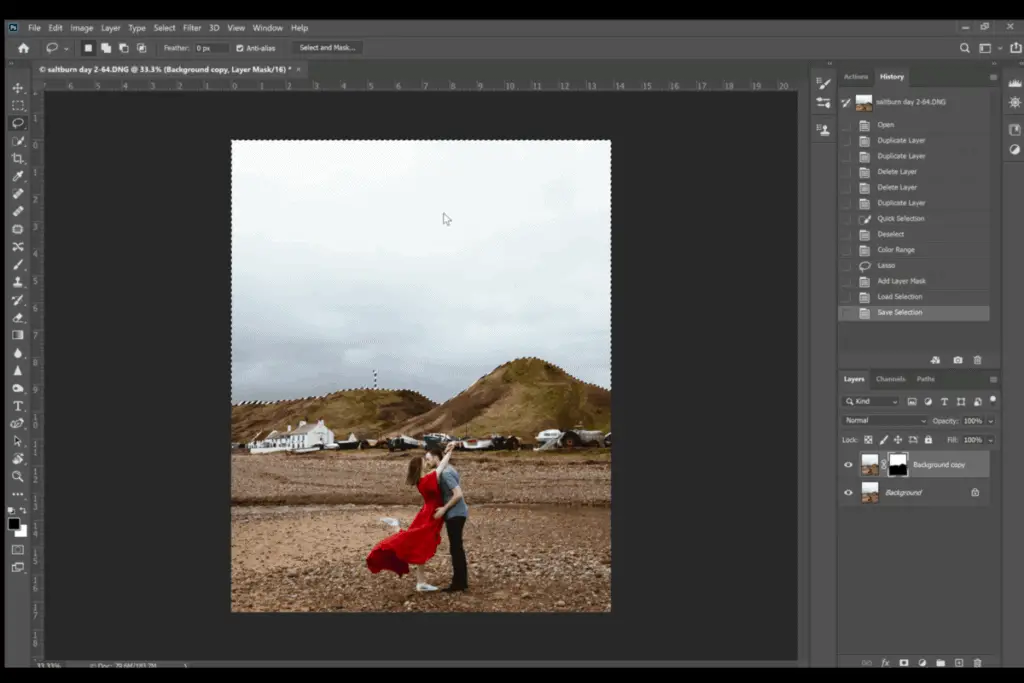
Step 5: Save Your Selection
Once you’ve selected your sky, you can either make a layer mask by clicking the little square with a circle in it at the bottom of the layers palette or save the selection by clicking “Select” and “Save Selection“.
Your saved selection will be available for use in the channels palette and can be re-selected by holding ctrl and clicking on the black and white image portion of the layer.
Saving your selection allow you to come back in the future if you need to Photoshop your sky or use Photoshop overlays again.
Step 6: Find FREE Sky Overlays/Replacements
Now, find an image of a sky with which you would like to replace your original. You can either open your own photo or a free sky or find and download a free overlay on a site like Unsplash. From rainbows and sunny skies to storm clouds and tornadoes, you’ll find everything.
Step 7: Apply the Sky Overlay in Photoshop
Open the image of the sky in Photoshop. It will open in a different space so you’ll need to drag the layer into your original photograph. The layer will appear and you want to make sure that it is on top of your other layers (highest up in the list of layers). At this point, you should see three layers in the palette.
Reposition your sky by clicking “Ctrl t” and dragging it to make sure that it will cover the full area of the selection (you don’t need to have the sky selected at this point). If it goes beyond the selected sky, that’s fine too.
Hit enter to confirm the transformation.
Now, we’re going to use the selection that you made earlier. If you created a layer mask, you can drag it up to your sky layer.
If you saved it in the channels palette, click on the black and white image part of the layer while holding ctrl to capture the selection again. You can release ctrl once the selection has been made. Now, go back to your layers palette, click the sky layer, and add a layer mask by clicking the rectangle with the black circle in it.
You should now have the sky overlay Photoshop created by referencing your layer mask. If you had trouble selecting your skyline, use either the black or white brush (depending on how you made your selection) to add or erase parts of the sky that you didn’t want or want back. If you mess up just switch to the opposite color (black or white) to fix it.
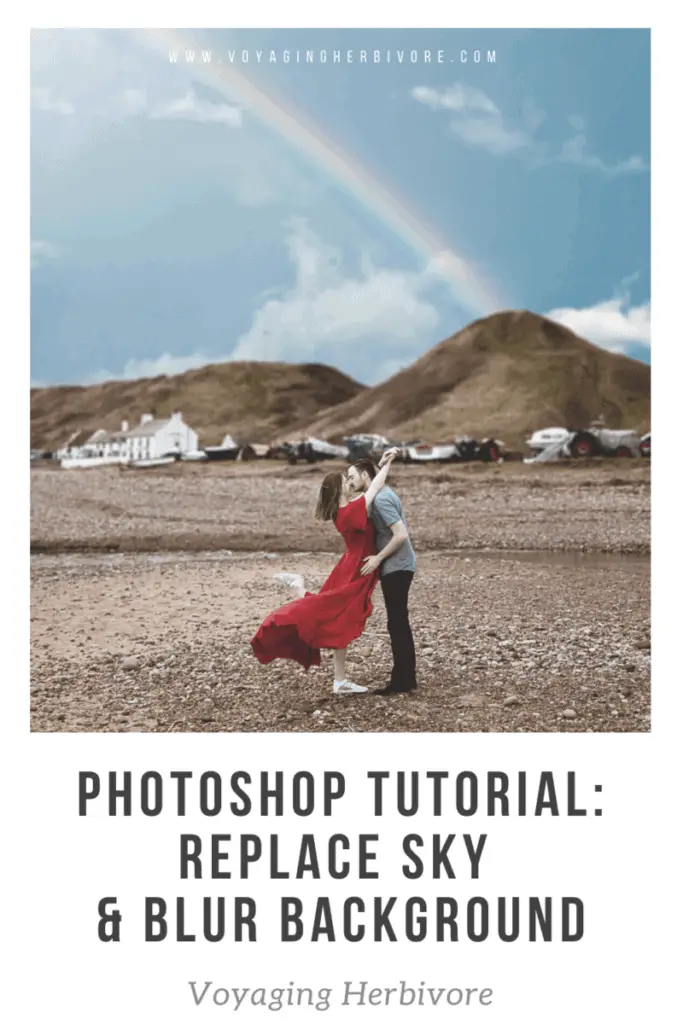
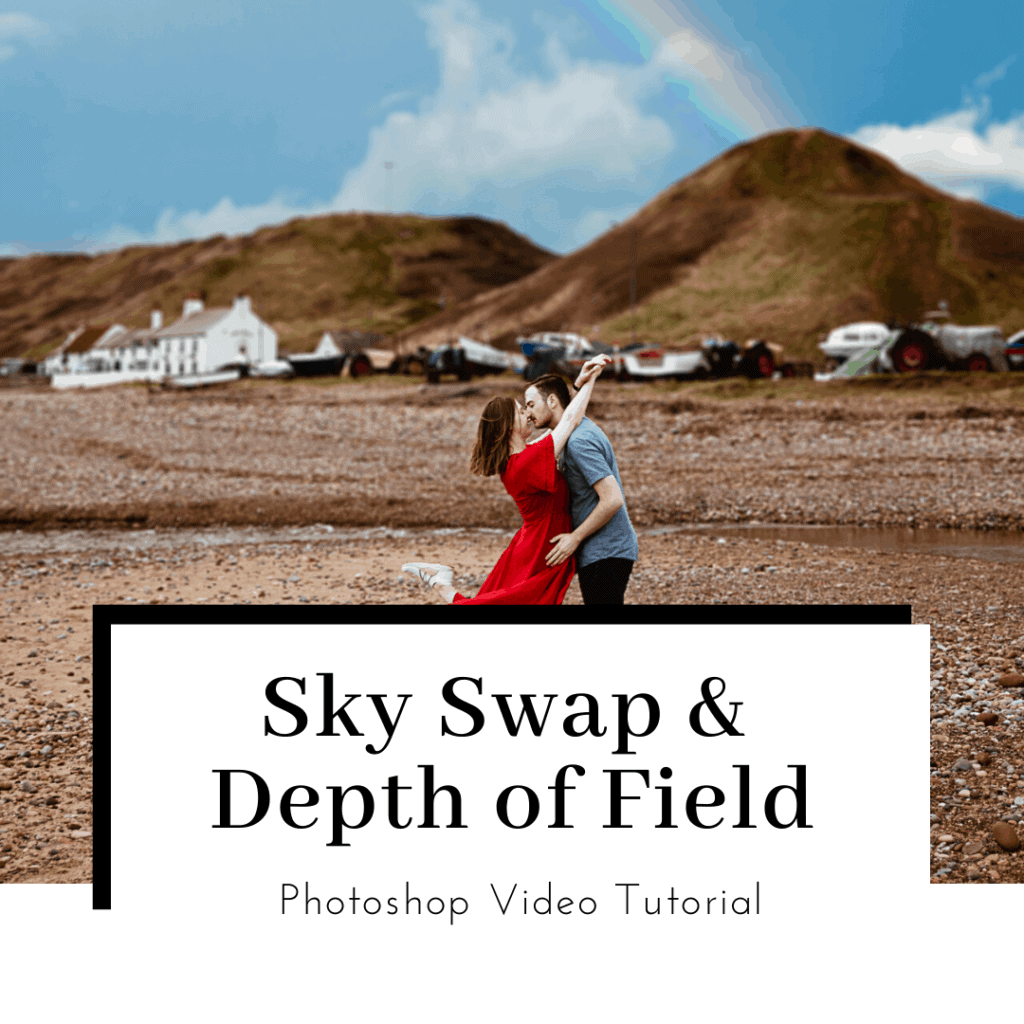
At this point, your sky should be looking pretty good! If you take it a step further and add a deeper depth of field (make the background blurry so your subject pops more – keep reading!)
Adding Depth of Field (Blurry Background) in Photoshop
Step 1: Prepare for Blurring Your Background
If you’re going to continue with this tutorial and blur your background in Photoshop, you’ll want to do one of two things.
Method 1: The first option is to flatten your image if you’re completely happy with your sky and you don’t want to play around with it anymore. Go to “Layer” – “Flatten Image“. All of your layers will be merged into one and you can move onto blurring your background.
Method 2: If you think that you might want to play with your sky later, but you still want to give the added depth of field a shot, click on your uppermost layer, and then press (all together) “Ctrl Alt Shift E“. A new layer will be created.
Now we’ll jump into adding a deeper depth of field to this image.
Note: If you want to create a deeper depth of field in camera, you’ll want to use an aperture of 1.8 (or the smallest number that your camera allows). If you’re in the market for a portrait lens with a luxurious depth of field, check out these recommendations.
$ 35mm | $$ 35mm | $ 50mm | $$ 50mm
Step 2: Select Your Subject
Next, we need to create a layer to blur so that we can separate our subject from our background.
Create a copy of your top most layer, which at this point should be the layer that has your sky and Lightroom edits all together. Basically, it should look ready for print or Instagram minus the added depth of field.
Create a copy by click Ctrl J or by dragging it to the new layer button in the layers palette. Now, click on the lower copy to make sure that you are active on it.
On the topmost layer, select your subject by using the selection tool, the magic wand, or the object select tool which is available in newer versions of Photoshop.
You don’t need to worry too much about the feet of your subject since the plane that they’re on won’t have a blur for a more realistic effect. That being said, the more time you spend working on a careful selection, the better that the finished photo will look.
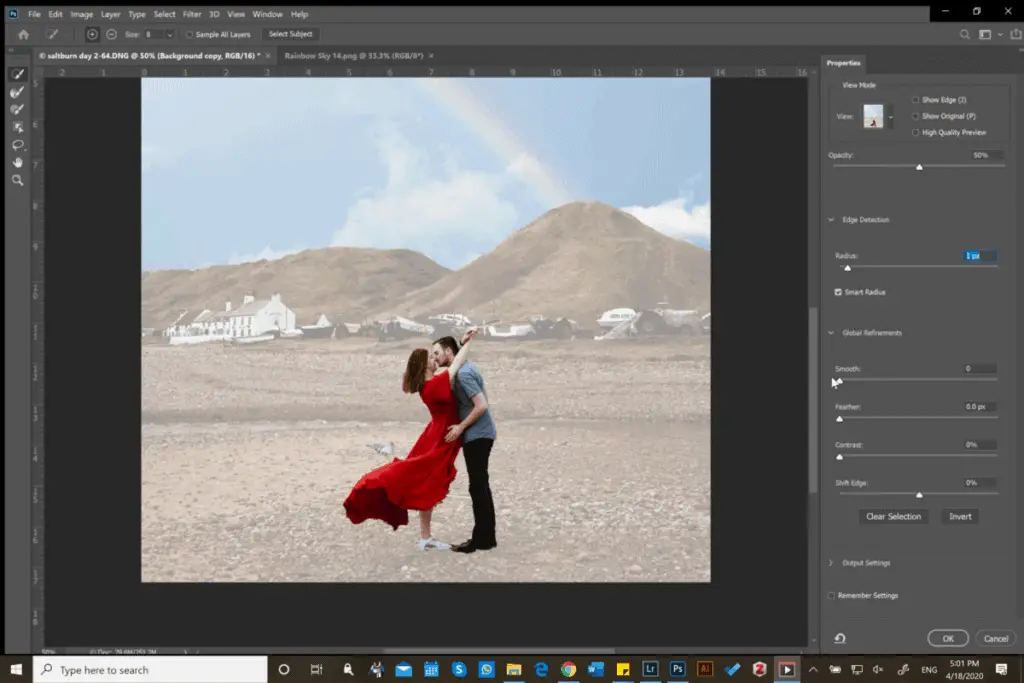
Use the “Select and Mask” button at the top to refine your selection, feather it, and smooth it. Click okay when you are happy with your selection.
Still active on the uppermost layer, apply a layer mask.
Step 3: Create a Layer to Blur
Click on the second highest layer (the one without the layer mask).
Select the subject again by loading it from the layer mask above. Hold ctrl while you click on the mask or black and white image in the channels palette.
Once your selection has loaded, go “Select” – “Modify” – “Expand selection” and put in 5 pixels. Click Ok.
Your selection will expand. Make sure that you have clicked on the select tool and then right-click on your selection and click “Fill“. Select “Content-aware” from the drop-down menu and click okay.
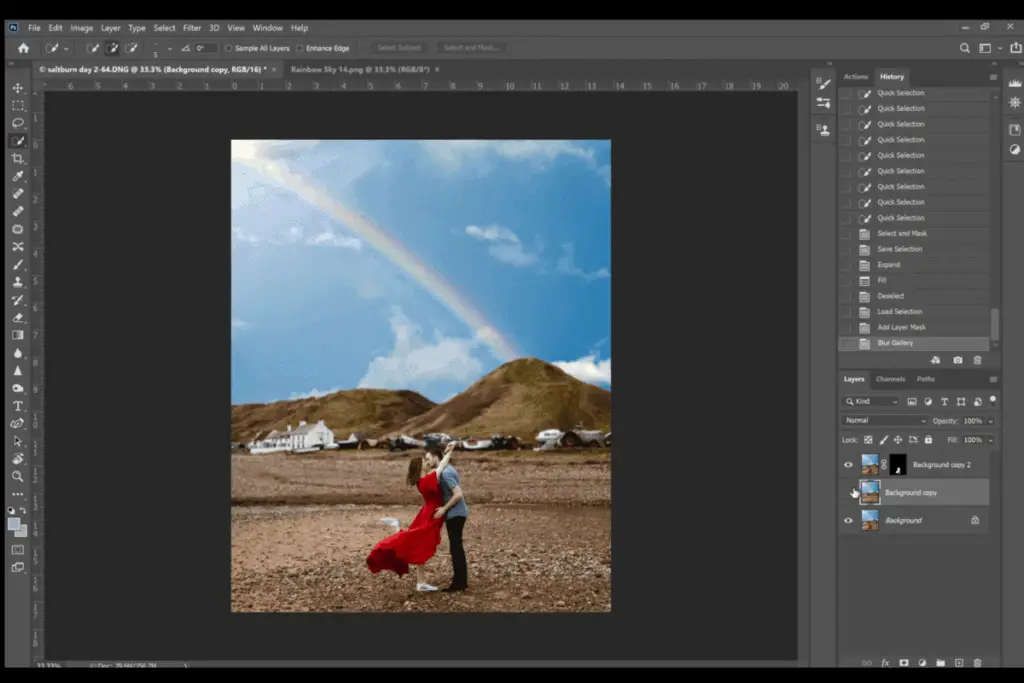
Your computer will probably need a few seconds. Once it has finished loading, click the eye on the uppermost layer to turn off the layer. You should now see an image without your subject in it. It doesn’t need to be perfect.
Step 4: Use Field Blur
Now, making sure that you are still active on the layer without your subject but that your top layer has the eye turned on, we’re going to blur. Make sure you save as a PSD at this point, because using a blur filter takes a lot of RAM and could cause your computer to crash.
When you have saved, go “Filter” – “Blur Gallery” – “Field Blur”.
A window will pop open with a circle on your photo that you can move around. Move the circle to the feet of your subject, and use the outside part of the circle to turn the blur to zero.
Now, click on the head of your subject. Another circle will appear. Turn the blur to 7 or 8 to start and see how you like the effects. If your subject is far away from the camera, you might need to add another circle at the bottom of the frame, and turn the blur to 3 or 4.
When you are happy, click Ok and let Photoshop work its magic.
At this point, you should have a new sky, and a deeper depth of field. If you want to go back and work on your sky, you will need to delete the two layers we added, make your sky changes, and then repeat this process.
When you’re ready to save your image, you can either export it has a PNG file for specific sizes, or you can use File and Save As to select a more general quality.
Photoshop Actions for Sky
If you liked this process and want to do it faster next time, consider creating your own Photoshop actions. Actions allow you to replay a set of moves that you make in Photoshop to edit photos more quickly and consistently.
There are a wide variety of actions that you can shop for, from sky replacing to adding bunnies to your photograph. Many actions you purchase will also come with free overlays.
To do this process about 10x faster, we use Summerana presets. If you’re looking to imrpove your photo editing skills, it’s definitely worth checking out the membership.
Essential Photography Tools
In order to create this photo, here are the specific tools that we used.
Camera and Lens: Nikon d750 and the Nikon Wide Angle 18-35mm f/3.5-4.5 FX
Tripod: Aluminum Tripod
Computer: Windows Surface Book
Software: Lightroom and Photoshop
Computer Pen: Surface Pen
If you don’t have a touch screen computer, I recommend investing in something like a Wacom tablet for touch screen-like capabilities in Photoshop.
Read More: What’s in Our Camera Bag
Keep Learning Photography and Editing
Now that you know how to work with sky overlays in Photoshop and how to add a blurry background/ deepen the depth of field, why not keep learning!
If you’re a travel addict like we are, be sure to check out the rest of our photography guides to improve your travel photography. Above all, be creative! Let creating art be a fun process.
Questions? Let us know in the comments below!


What Camera Gear Do We Use?
- Camera body: Nikon d750
- Phone: iPhone 13 Pro
- Favorite Multipurpose Travel Lens: 24-120mm f/4
- GoPro: GoPro Hero 8
- Drone: DJI Mavic Air is no longer available so we recommend the DJI Air2S
- Camera Bag: Wandrd Prvke 31L
- Tripod: ESDDI Aluminum Tripod
If you want the full list of things we keep in our camera bag, check out the complete guide or browse our photography guides.
Free Resources
Pin Sky Overlay Photoshop and Blurring Background Tutorial
And as always, you can find more sustainable travel content on Instagram @VoyagingHerbivore, Youtube, and TikTok and to get updates straight to your inbox, enter your email below.
If you found this guide helpful and want to help us keep these resources free,
please consider making your next Amazon, Expedia, Hostel World, Etsy, Trivago, and Booking.com purchase through our links (just click right on those words – you can do it right now and unless you clear your cookies before your next purchase, it will remember). It costs you no extra and gives us a small commission. Thank you!

One response to “How to Easily Replace Your Sky in Photoshop & Find FREE Sky Overlays”
[…] Read More: Free Lightroom Preset (Photo Filter) Download […]